Polish Those Project Pictures
Tips and Tricks for Putting Your Best Face Forward
There is an old saying that goes something like this: “The best camera is the one you have with you.” While the saying was originally meant to encourage people to get out there and take photographs regardless of their equipment, it’s taken on a new meaning over the past 10 years. The smartphones we carry around in our pockets are equipped with cameras that are better than point-and-shoot cameras that cost $500 or more less than a decade ago. These cameras are capable of taking stunning images that, when taken correctly, stand up against cameras that cost thousands of dollars.
Despite smartphone cameras being so powerful, there’s more to taking a great photo than just pointing and shooting. And if you want your potential clients to get a good look at what you can deliver, it’s best to know how to harness the power of that camera to provide the best imagery possible. Below are a few tips and tricks to remember when shooting your work.
SETTINGS:
Largest Photo Size
Get into your camera settings and make sure that you’re shooting photos as large as possible. Most smartphones these days can shoot photos that are 5000 pixels or larger, so make sure you’re capturing the largest images you can.
Aspect Ratio
Make sure your phone is shooting photos in 16:9 aspect ratio. Most phones will default to a 16:9 aspect ratio (think widescreen) but some will default to 4:3 (think TV before widescreen). Although both are fine, we live in a widescreen world now, so it only makes sense to shoot in widescreen.
COMPOSITION:
Horizontal
First and foremost, hold your phone horizontally when taking photographs of your projects. Whether on screen, in print or in a large format setting, photos are almost always displayed horizon- tally, so it only makes sense to take them the same way.
Exceptions would be when taking individual portraits and when taking photos of tall, vaulted spaces (like a two-story entryway) or small narrow spaces (like a small guest bathroom). Then it makes sense to take vertical photos of vertical spaces or things.
Think in thirds
When composing a photo, especially photos that show an entire structure/project, think about separating the picture into thirds. In this example at the top of the right page, the foreground (grass) takes up a third of the photo, the subject (parking garage and train) takes up a third and the background (sky) takes up a third.
The same rule applies to the left, right and center thirds of a photograph, too. The trees are in the left third, the subject (red sign) is in the middle third, and the tracks are in the right third. The inserts show similar photos of the same subject that are composed poorly. The top insert is too close, and the bottom insert is too far away.
Perspective
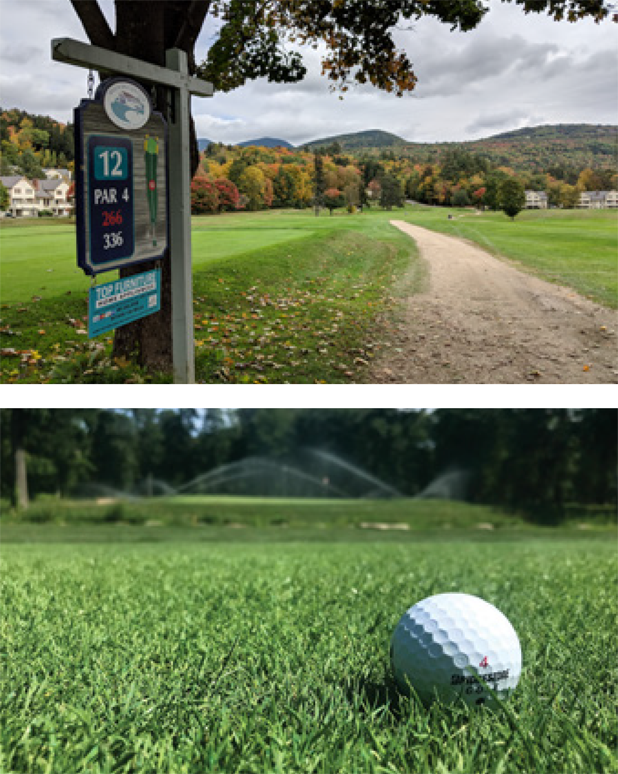
Don’t always take photos from the same perspective. 99 percent of smartphone photos are taken chest high and straight on, but that’s not always the best angle. Sometimes photos need to be taken off center, with an object in the foreground (see the golf photo) or from a lower angle (see the golf ball image). Don’t be afraid to experiment with angles and perspective.
EXPOSURE
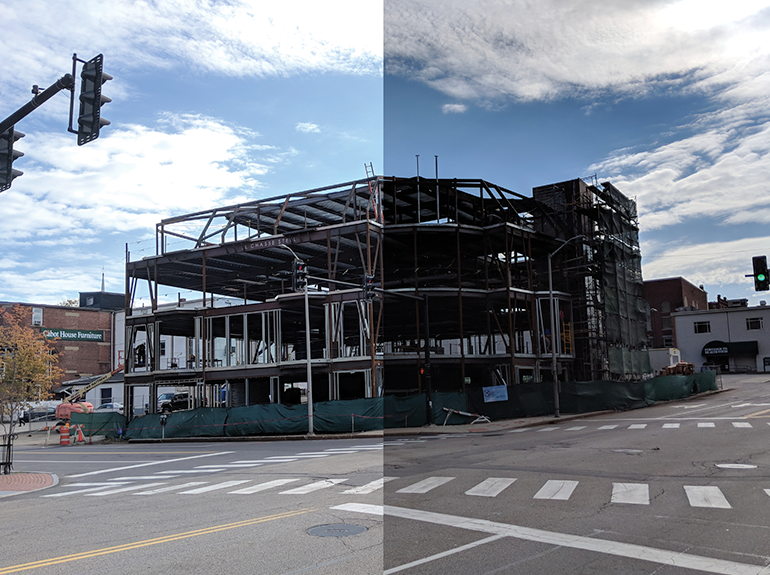
The most important part of taking a good photo is to make sure the exposure is set correctly. Without getting too technical, exposure is the amount of light that reaches your camera sensor, and it is a crucial part of how bright or dark your pictures appear. Smartphone cameras automatically set the exposure so that the brightest part in the frame is in focus and clear. When taking photos outside, this results in a high level of contrast between the sky and objects that are not in direct light. Fortunately, setting the exposure on smart- phone cameras is easy. Simply tap the part of the photo you want to be in focus/well lit and the camera will automatically adjust. The example below is actually two photos laid over each other. The right side of the image is the default setting. The sky is a crisp blue, but the building and all of the foreground is dark and lacks detail. On the left side, the building was tapped on the smartphone screen to set the exposure and allow more light in. The sky is a bit washed out, but you can see much more detail in the building.
A FEW EXTRAS
Although those are the “big three” when it comes to taking great photographs with your smartphone, there are a few other quick pointers to make sure you capture an image that you’re proud of.
- Perspective/Angles. Don’t be afraid to experiment with angles and perspective as there’s no limit to the number of shots you can take — which leads right into the last tip…
- Take many pictures of the same shot. Seriously, don’t be Years ago, photographers had to be economical with their shots. Rolls of film had limited exposures and were pricy to develop. Fortunately, your smartphone has almost unlimited storage, so take as many as you can and pick the best one.
SEND US SOME PHOTOS
Send photos to submissions@nhhba.com with the word “Submissions” in the subject line, or navigate to our website at www.nhhba.com and click the “Submit Photo” button on the bottom of the home page. If we use your photo, we’ll give your business a shoutout!

A graduate of the University of Tampa, Steve Bowles has spent his entire professional career in marketing. Away from the office, he’s all about sports — rooting for Boston teams and playing golf all summer and skiing all winter.

Rule of Thirds, vertically

Rule of Thirds, horizontally

Experiment with perspective

Changes in Exposure
Events
